What is easySIPp?
A web-based frontend for SIPpdd, making SIP call testing accessible via a modern interface.
CRITICAL REQUIREMENT:
EasySIPp MUST be installed on a DIFFERENT server than your FreeSWITCH/FusionPBX. Do not attempt to run valid load tests on the same machine as the switch.
1. Prerequisites
Ensure Docker and Docker Compose are installed on your Linux server.
docker --version
docker-compose --version
2. Deployment Steps
Run the following commands on your Linux server to set up the project.
Step 2.1: Create Project Directory
mkdir -p /opt/easysipp
mkdir -p /opt/easysipp/xml

# move to directory

cd /opt/easysipp
Step 2.2: Create the Custom Scenario (uac_custom.xml)
This special scenario ensures every call has a unique Caller ID
nano xml/uac_custom.xml
Paste the following content exactly:
<?xml version="1.0" encoding="ISO-8859-1" ?>
<!DOCTYPE scenario SYSTEM "sipp.dtd">
<scenario name="Unique Caller ID UAC">
  <!-- Small delay before INVITE to stagger start -->
  <pause milliseconds="2000"/>
  <send retrans="500">
    <![CDATA[
      INVITE sip:[service]@[remote_ip]:[remote_port] SIP/2.0
      Via: SIP/2.0/[transport] [local_ip]:[local_port];branch=[branch]
      From: sipp-[call_number] <sip:sipp-[call_number]@[local_ip]:[local_port]>;tag=[pid]SIPpTag00[call_number]
      To: [service] <sip:[service]@[remote_ip]:[remote_port]>
      Call-ID: [call_id]
      CSeq: 1 INVITE
      Contact: sip:sipp@[local_ip]:[local_port]
      Max-Forwards: 70
      Subject: Performance Test
      Content-Type: application/sdp
      Content-Length: [len]
      v=0
      o=user1 53655765 2353687637 IN IP[local_ip_type] [local_ip]
      s=-
      c=IN IP[media_ip_type] [media_ip]
      t=0 0
      m=audio [media_port] RTP/AVP 0
      a=rtpmap:0 PCMU/8000
    ]]>
  </send>
  <recv response="100" optional="true"></recv>
  <recv response="180" optional="true"></recv>
  <recv response="183" optional="true"></recv>
  <recv response="200" rtd="true"></recv>
  <send>
    <![CDATA[
      ACK sip:[service]@[remote_ip]:[remote_port] SIP/2.0
      Via: SIP/2.0/[transport] [local_ip]:[local_port];branch=[branch]
      From: sipp-[call_number] <sip:sipp-[call_number]@[local_ip]:[local_port]>;tag=[pid]SIPpTag00[call_number]
      To: [service] <sip:[service]@[remote_ip]:[remote_port]>[peer_tag_param]
      Call-ID: [call_id]
      CSeq: 1 ACK
      Contact: sip:sipp@[local_ip]:[local_port]
      Max-Forwards: 70
      Subject: Performance Test
      Content-Length: 0
    ]]>
  </send>
  <!-- ✅ Call duration: 1 Hour (3600000 ms) -->
  <pause milliseconds="3600000"/>
  <send retrans="500">
    <![CDATA[
      BYE sip:[service]@[remote_ip]:[remote_port] SIP/2.0
      Via: SIP/2.0/[transport] [local_ip]:[local_port];branch=[branch]
      From: sipp-[call_number] <sip:sipp-[call_number]@[local_ip]:[local_port]>;tag=[pid]SIPpTag00[call_number]
      To: [service] <sip:[service]@[remote_ip]:[remote_port]>[peer_tag_param]
      Call-ID: [call_id]
      CSeq: 2 BYE
      Contact: sip:sipp@[local_ip]:[local_port]
      Max-Forwards: 70
      Subject: Performance Test
      Content-Length: 0
    ]]>
  </send>
  <recv response="200" crlf="true"></recv>

  <ResponseTimeRepartition value="10, 20, 30, 40, 50, 100, 150, 200"/>
  <CallLengthRepartition value="10, 50, 100, 500, 1000, 5000, 10000"/>
</scenario>
Step 2.3: Create docker-compose.yml
nano docker-compose.yml
Paste the following content:
version: '3.8'
services:
  easysipp:
    container_name: easysipp
    image: krndwr/easysipp
    network_mode: host
    user: root
    # Mounts the custom XML folder so you can see uac_custom.xml in the GUI
    volumes:
      - ./xml/uac_custom.xml:/app/easySIPp/xml/uac_custom.xml
    # Automagically moves GUI to 8089 and App to 8001 to avoid host conflicts
    entrypoint: >
      /bin/sh -c "
      sed -i 's/8080/8089/g' /etc/nginx/sites-available/easysipp-nginx.conf &&
      sed -i 's/8000/8001/g' /entrypoint.sh &&
      sed -i 's/8000/8001/g' /etc/nginx/sites-available/easysipp-nginx.conf &&
      /entrypoint.sh"
    cap_add:
      - NET_RAW
      - NET_ADMIN
    restart: unless-stopped
Save and exit (Ctrl+X, Y, Enter).
Step 2.4: Start the Container
docker-compose up -d --build
3. Configuration
Access the Web GUI at:
http://<YOUR_SERVER_IP>:8089
1. Verify Connectivity
Ensure your EasySIPp server can reach the remote FreeSWITCH server:
ping <FREESWITCH_IP>
2. Trust Setup (Crucial)
You must tell the Remote FreeSWITCH to trust your EasySIPp IP, or it will reject calls with 407 Proxy Authentication.
FusionPBX GUI Instructions:
-
Log in to the Remote FusionPBX.
-
Go to Advanced -> Access Control.
-
Select the
providerslist (if creating a new one, set default todeny). -
Add your EasySIPp Server IP (e.g.,
192.168.2.24/32) with Typeallow. -
Navigate to Status tab and then click on SIP Status.
-
Important: Click ReloadACL at the top right of the page.
3. Start the Test
In the EasySIPp GUI (UAC Tab):
-
Select UAC XML:
uac_custom.xml(This matches the file you created). -
Remote Address:
<FREESWITCH_IP> -
Remote Port:
5060 -
Local Address:
0.0.0.0(Binds to all interfaces) -
Local Port:
5062 -
Dialed Number: (Your target extension or inbound route. Append 11 on the start and then your internal DN. For example, internal DN is 1225 then route will be 111225)
-
Protocol:
UDP
Configuration on the Remote Server
-
Create an inbound route as shown below.
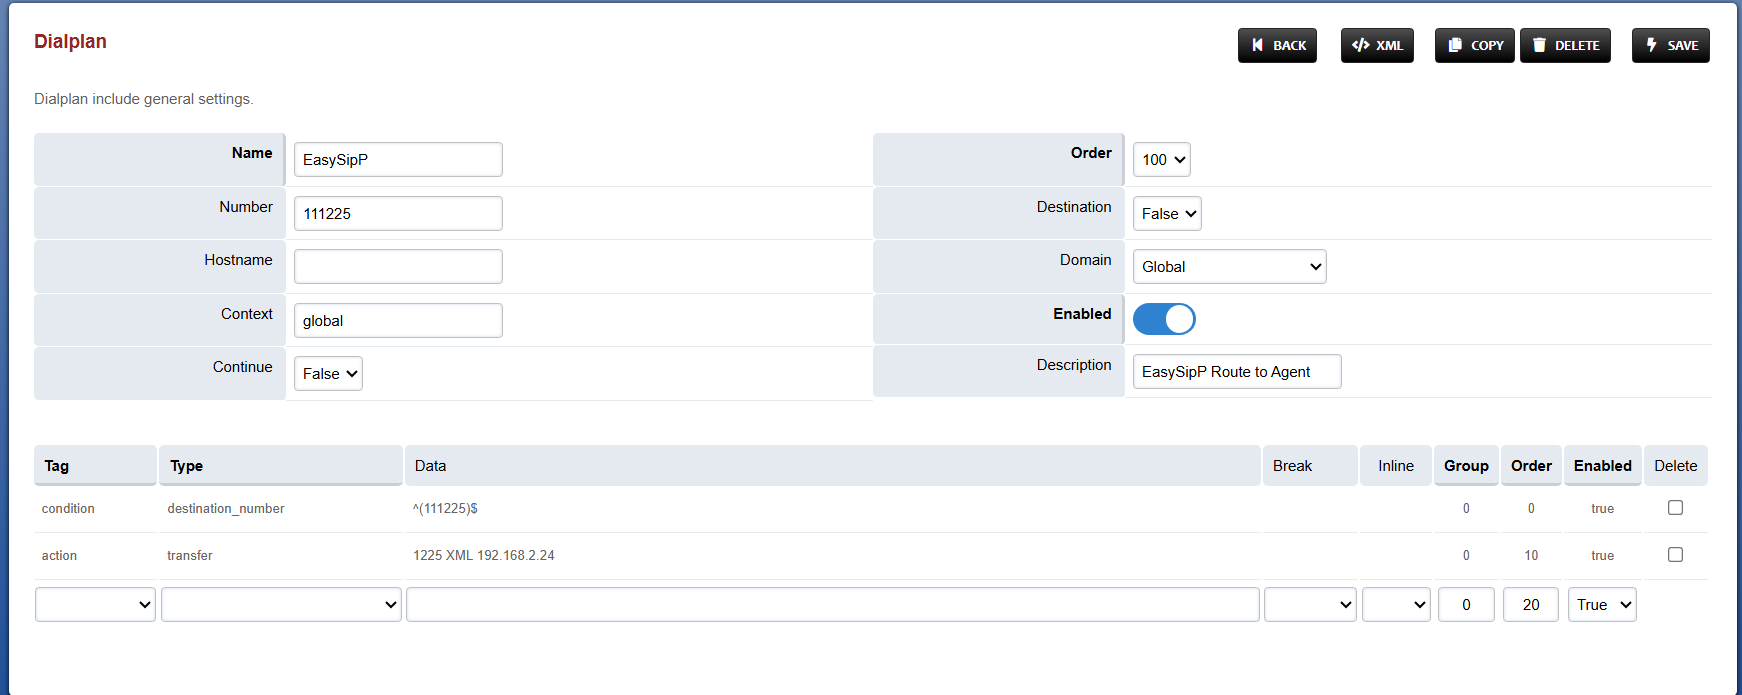
2 . Then, create a dialplan as illustrated below.

On the media server, in the scripts directory (/usr/share/freeswitch/scripts), Place the file cxIvr1225.lua
Here is the generic format of file name: cxIvr<DN>.lua