This guide provides step-by-step instructions for deploying and configuring Conversation Studio access within your CX environment. It covers the deployment process through the CX Core Helm chart and IAM (Keycloak) configuration required for user access.
This guide needs to be followed to access Conversation Studio after the CX Deployment
The intended audience for this guide, including deployment, access, troubleshooting, and setup procedures for Conversation Studio, is Support/OPS teams and System Administrators responsible for deploying and accessing Conversation Studio on the target machine.
Pre-requirements
- CX Deployment Helm-based Deployment for Expertflow CX
Step 1: Deploy the CX Core Helm Chart
Conversation Studio will be deployed as part of the CX Core Helm chart installation.
No separate deployment is required for Conversation Studio.
Step 2: IAM (Keycloak Configuration) - Mandatory
To access the Conversation Studio UI, make sure you perform the following steps in Keycloak:
-
Create a new user.
-
Assign the
conversation-studio-adminrole to that user. -
Log in to the UI using this user's credentials.
Step 3: Accessing Conversation Studio
Once the deployment completes successfully, Conversation Studio will be available at:
https://<FQDN>/conversation-studio
Setting Up Survey Messages
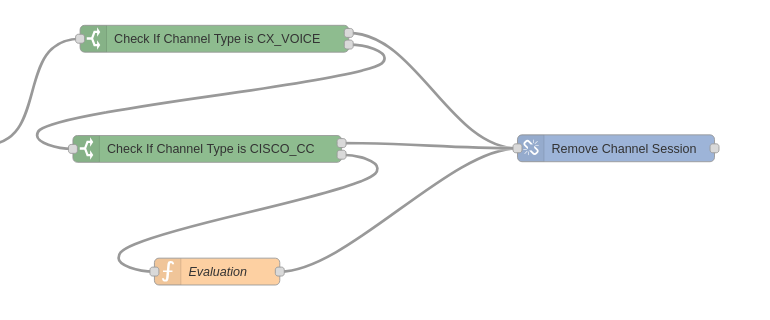
In versions prior to CX 5.0, survey handling inside the Participant Role Changed flow was done through a Function node named Evaluation as shown in figure 1.
This node performed the following actions:
-
Retrieved all available survey forms
-
Selected a survey form to use
-
Generated the survey message
-
Sent the message to the Conversation Manager
-
Passed the original message forward to the next Node-RED node
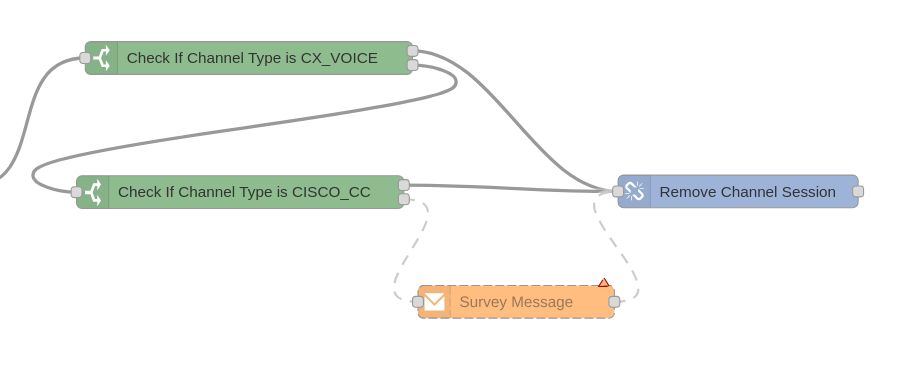
Changes in CX 5.0
Starting from the 5.0 release, the Evaluation Function node has been replaced with a dedicated node called Survey Message as shown in figure 2. This new node is included in the Participant Role Changed flow but is disabled by default, because it requires a survey form to be selected.
How to Enable Survey Message Sending
Before enabling survey message sending, ensure that the required survey form is already configured in Unified Admin. Only the forms configured in Unified Admin will appear in the dropdown list of the Survey Message node.
For Deployments Using Default Training
To activate the survey message functionality:
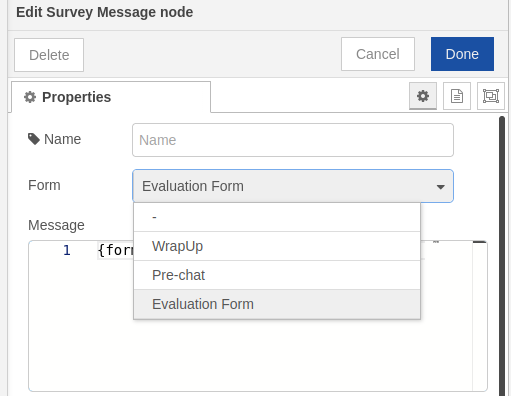
-
Open the Survey Message node in the flow
-
Select the survey form that you have configured in Unified Admin from the dropdown list as shown in figure 3.
-
Deploy the flow
Once configured, this node will send the selected survey message through the Conversation Manager.
For Deployments Using Custom Training
If your deployment includes custom training, your flow might contain the legacy Evaluation Function node from earlier versions.
In such cases:
-
Remove the legacy Evaluation node from the Participant Role Changed flow
-
Add the new Survey Message node in its place
-
Configure the node by selecting the survey form from the dropdown (as described above)
-
Deploy the updated flow
This ensures the environment uses the new, supported Survey Message mechanism introduced in CX 5.0.