Voice Connector
Voice Connector
-
SSH onto the Debian server on which the Voice connector is installed.
-
Use command
ssh <username>@<server-ip> -
Enter user password and press ENTER.
-
Use command
su -
Enter root password and press ENTER.
-
-
Run the command to see the list of running containers
docker ps -
Note the container ID of the current deployed 4.5.1 Voice connector.
-
Note the port of that container i.e. for 0.0.0.0:8116->8080/tcp, :::8116->8080/tcp, the port of the container is 8116.
-
Run the command to stop the container
docker stop <container-ID> -
Run the command to remove the container
docker rm <container-ID> -
Navigate to the folder where the docker-compose.yml and env.txt files are located for the voice connector.
-
Open the docker-compose.yml file and replace the text inside with text below:
version: "3.8" services: voice-connector: image: gitimages.expertflow.com/freeswitch/ecx_generic_connector:4.9.1 deploy: resources: limits: memory: 1024m reservations: memory: 256m container_name: unified-voice-connector ports: - PORT:8080 env_file: - ./env.txt command: ["java", "-Xms256m", "-Xmx1024m", "-XX:+UseG1GC", "-XX:MinHeapFreeRatio=10", "-XX:MaxHeapFreeRatio=30", "-jar", "/app/ecx_generic_connector.jar"] restart: always -
Replace the PORT keyword with the port noted above in step 4.
-
Open the env.txt file and remove the fields MIDDLEWARE_API, DB_NAME, DB_URL, DB_PORT, DB_USERNAME, DB_PASS, DB_CONN_TIMEOUT and DB_DRIVER.
-
Run the command
docker compose up -d -
Confirm that the docker container is running by using the command
docker ps
-
Confirm that the container is running correctly by opening the logs with command
docker logs -f containerID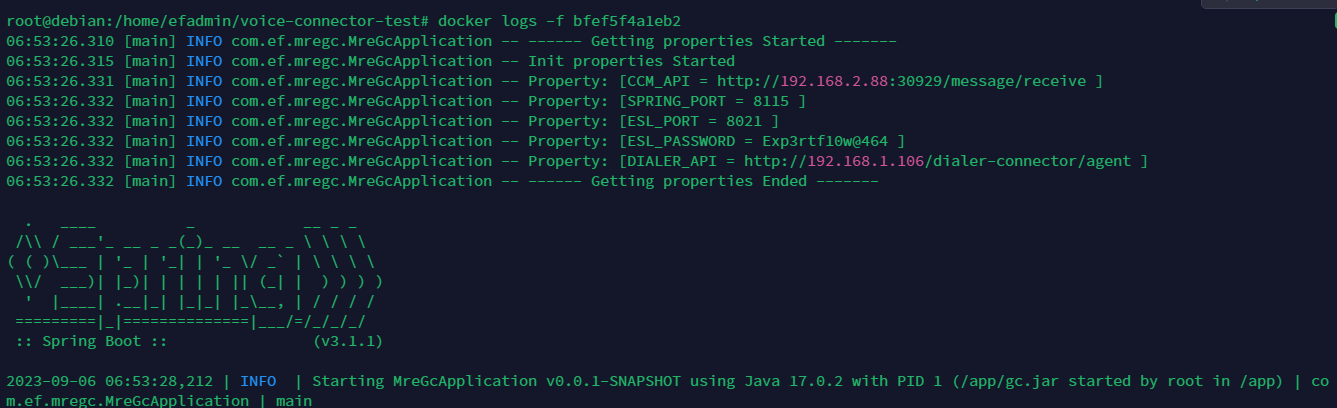
VRS
Add Indexing in Media Server Database
-
While on the Media Server, run the following command and note the output password:
cat /etc/fusionpbx/config.conf | grep database.0.password -
Run the following command and enter the password noted before:
psql -h 127.0.0.1 -p 5432 -U fusionpbx -d fusionpbx -
Run the following command:
CREATE INDEX idx_mykey ON v_xml_cdr USING GIN (json) WHERE json->'variables' ? 'sip_h_X-CALL-ID';-
Note: If the number of calls on the system is too high, then the query will take a long time to execute.
-
Media Server configuration
Changes in Global Variables dialplan
-
Login to Media Server web interface.
-
Open in browser: https://IP-addr, where IP-addr is the IP address of the Media Server.
-

-
Add the username and password that was shown upon installation of Media Server and press LOGIN.
-
Press the IP address in the top right and select the Domain created in the Domain creation section above:

-
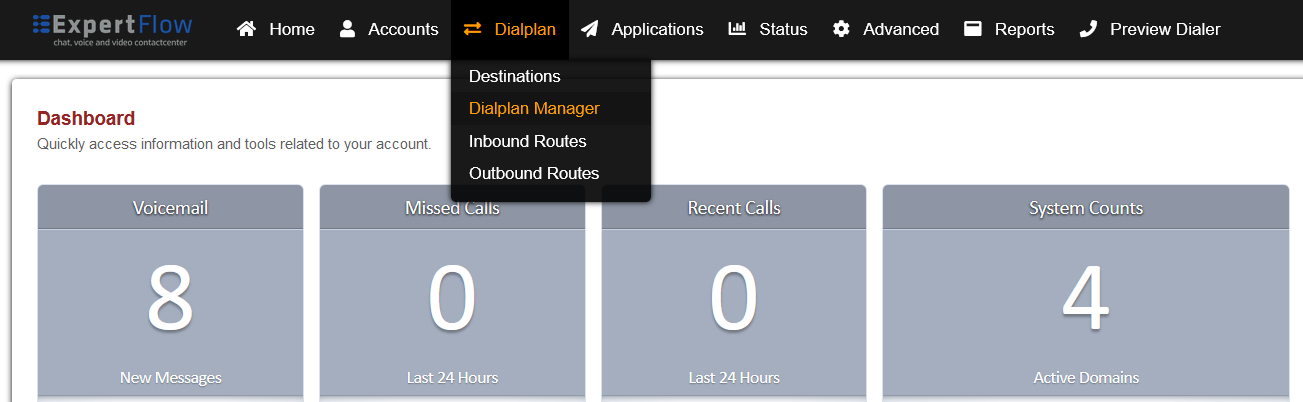
Open the Dialplan Manager section under the Dialplan tab.

-
Find and open the global-variables dialplan.
-
Add the following information to this dialplan (to add custom values in the Type column, select a random value then click on it to edit):
|
Tag |
Type |
Data |
Group |
Order |
Enabled |
|---|---|---|---|---|---|
|
action |
set |
FreeSWITCH-IPv4=${domain_name} |
0 |
20 |
true |
-
The result will look like:
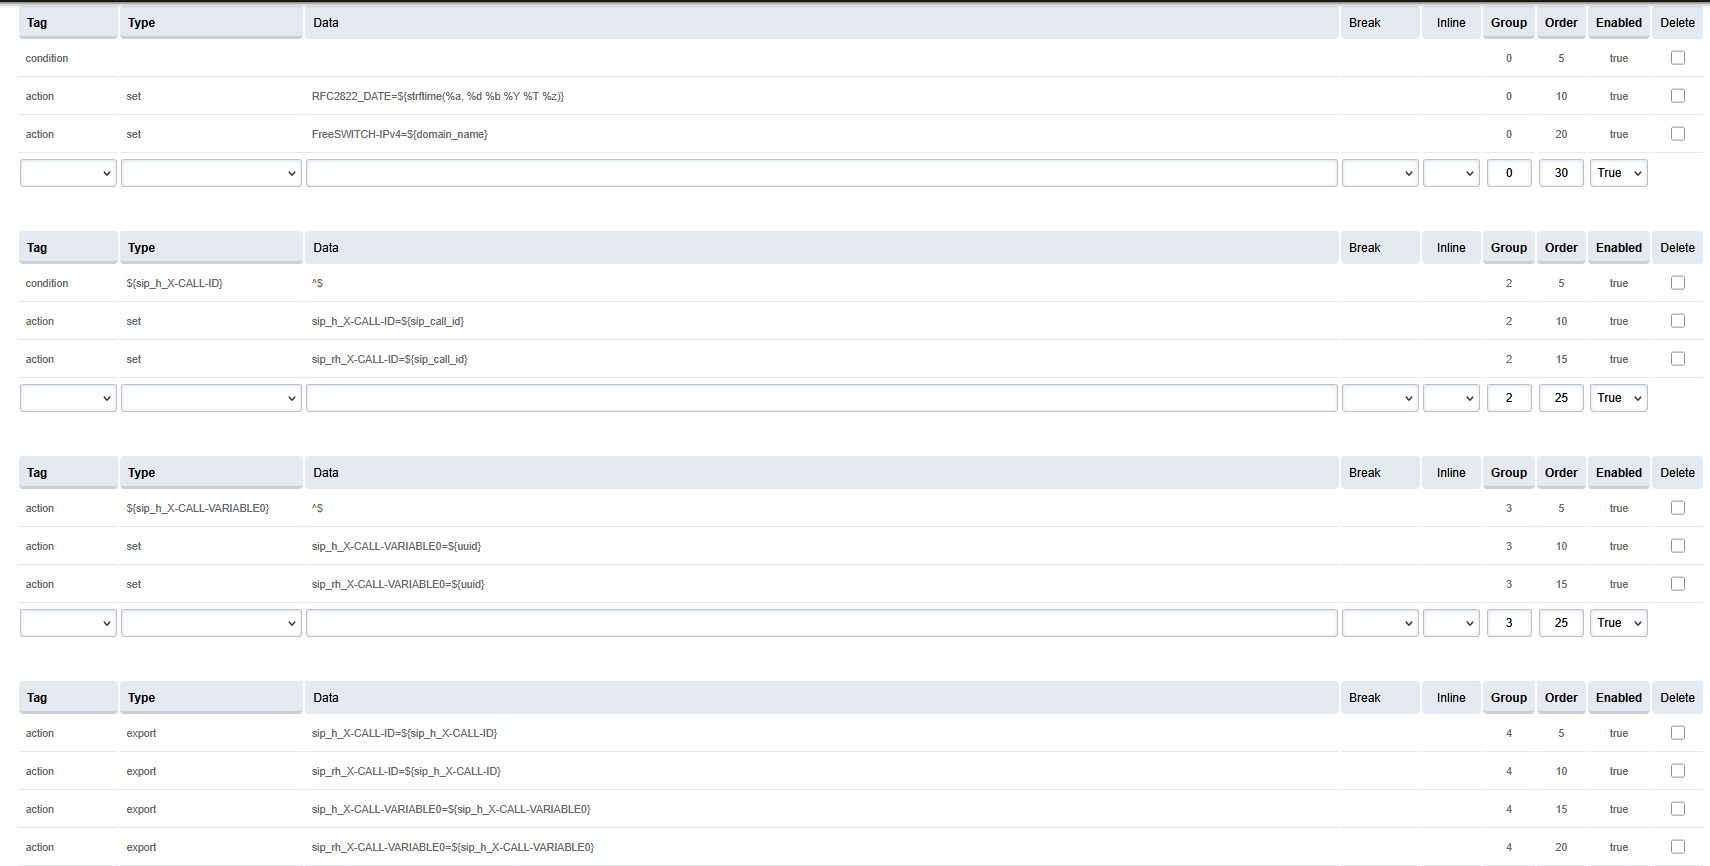
-
Save the changes by pressing SAVE button in top right corner.
Manual Outbound Dialplan
-
Login to Media Server web interface.
-
Open in browser: https://IP-addr, where IP-addr is the IP address of the Media Server.
-

-
Add the username and password that was shown upon installation of Media Server and press LOGIN.
-
Press the IP address in the top right and select the Domain created in the Domain creation section above:

-
Open the Dialplan Manager section under the Dialplan tab.
-
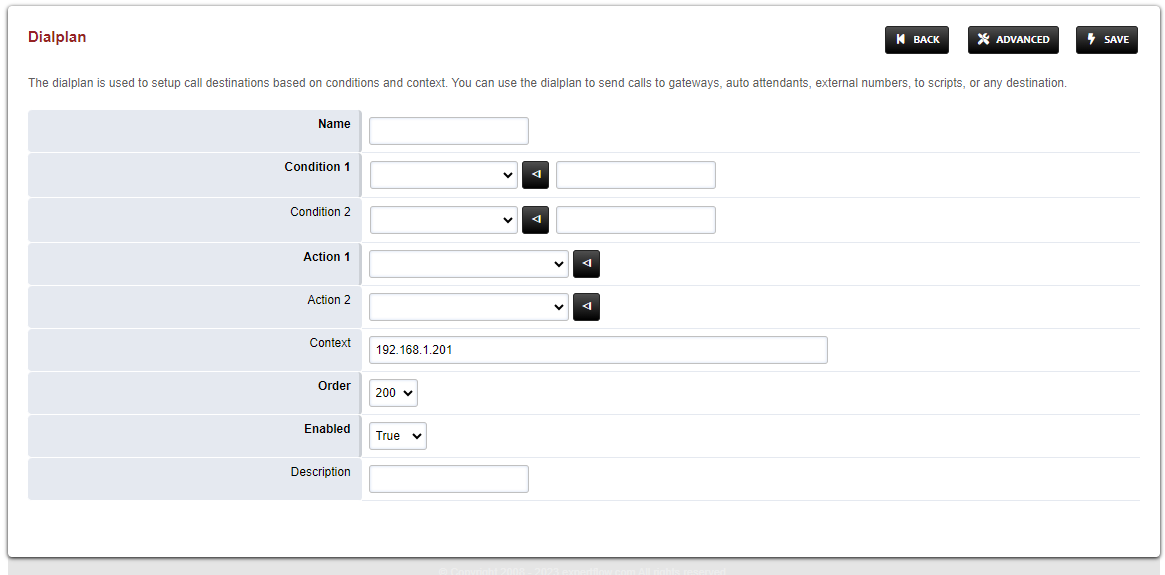
Add a new Dialplan by pressing the Add Button on the top.

-
Fill the form with following details :
-
Name = Manual_Outbound
-
Condition 1 = Click the black arrow to the right of the first field. In the first field enter ${sip_h_X-CallType} and in the second field enter ^OUT$.
-
Condition 2 = Click the black arrow to the right of the first field. In the first field enter ${customer_leg_uuid} and in the second field enter ^$.
-
Action 1 = Select first item from the list
-
-
Save the form by pressing save button on top right Corner.
-
Re-open Manual_Outbound dialplan.
-
Delete the line with the Action tag (Click the checkbox in the right and press SAVE in the top right)
-
Add the following information to this dialplan:
|
Tag |
Type |
Data |
Break |
Inline |
Group |
Order |
Enabled |
|---|---|---|---|---|---|---|---|
|
condition |
${sip_h_X-CallType} |
^OUT$ |
on-false |
|
0 |
5 |
true |
|
condition |
${customer_leg_uuid} |
^$ |
never |
|
0 |
10 |
true |
|
action |
set |
custom_origination_uuid=${create_uuid()} |
|
true |
0 |
15 |
true |
|
action |
set |
customer_leg_uuid=${custom_origination_uuid} |
|
true |
0 |
20 |
true |
|
action |
export |
customer_leg_uuid=${custom_origination_uuid} |
|
true |
0 |
25 |
true |
|
anti-action |
set |
custom_origination_uuid=${create_uuid()} |
|
true |
0 |
30 |
true |
-
Set the Context field to the value of the Domain set in the Domain creation section.
-
Set the Domain field to the value of the Domain set in the Domain creation section.
-
Set the Order field to 49.
-
Set the Continue field to True.
-
Save the changes by pressing SAVE button in top right corner.
Changes in Local extension Dialplan
-
Login to Media Server web interface.
-
Open in browser: https://IP-addr, where IP-addr is the IP address of the Media Server.
-

-
Add the username and password that was shown upon installation of Media Server and press LOGIN.
-
Press the IP address in the top right and select the Domain created in the Domain creation section above:

-
Open the Dialplan Manager section under the Dialplan tab.
-
Find and open the local_extension dialplan.
-
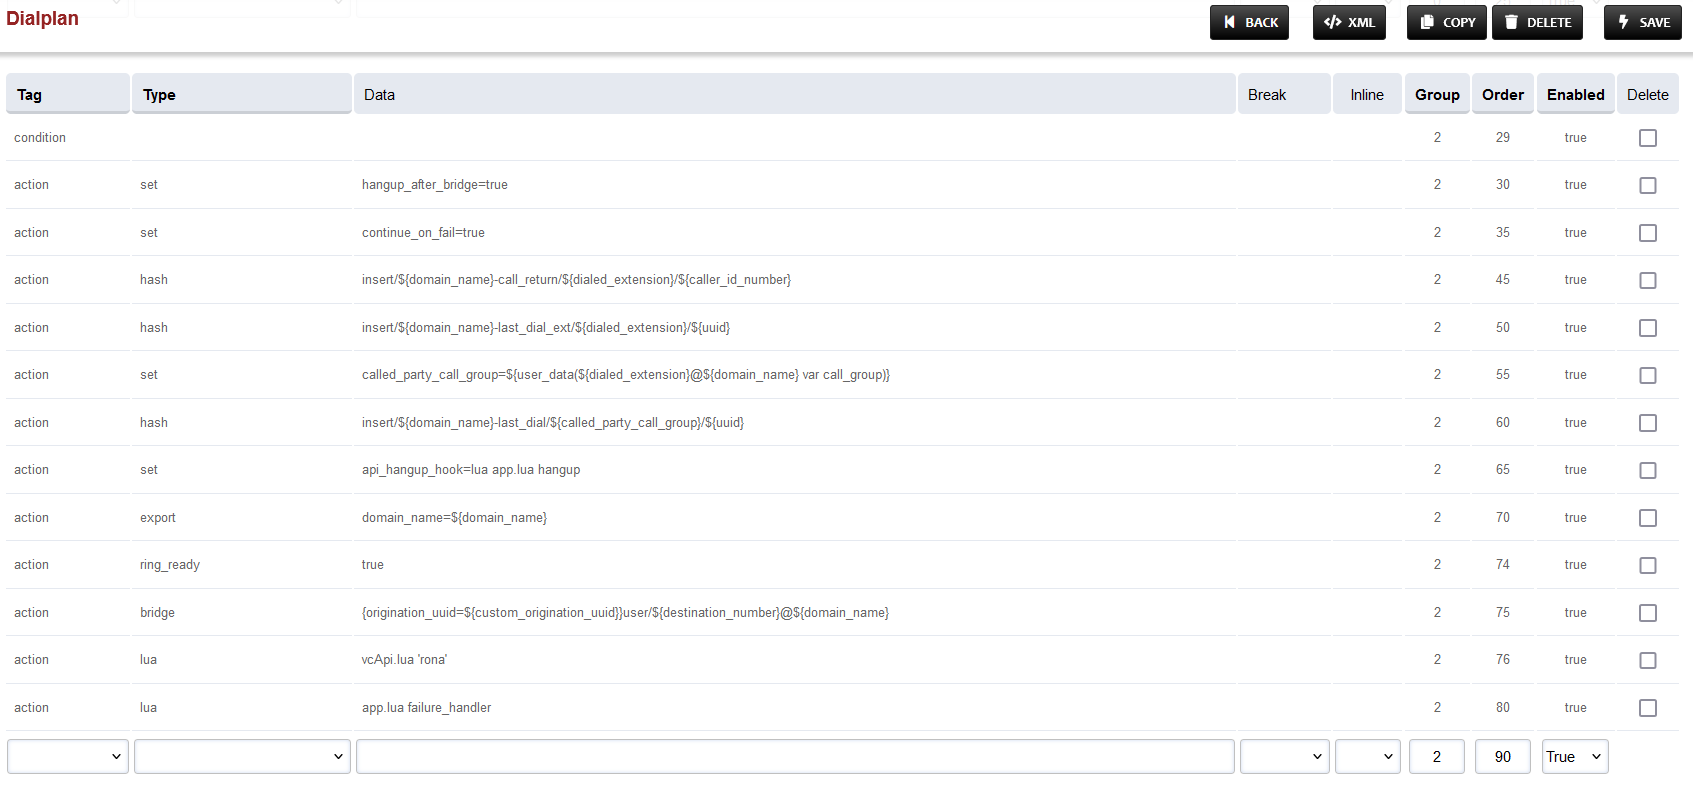
Add the following information to the last group:
|
Tag |
Type |
Data |
Group |
Order |
Enabled |
|
action |
ring_ready |
true |
1 |
74 |
true |
-
Secondly, replace the Data field in the line with Order 75 with: {origination_uuid=${custom_origination_uuid}}user/${destination_number}@${domain_name}
-
The result will look like this:
-
Save the changes by pressing SAVE button in top right corner.
Configuring route For Outbound calls
-
Login to Media Server web interface.
-
Open in browser: https://IP-addr, where IP-addr is the IP address of the Media Server.
-
-
Add the username and password that was shown upon installation of Media Server and press LOGIN.
-
Press the IP address in the top right and select the Domain created in the Domain creation section above:

-
Open the Outbound Routes section under the Dialplans tab.

-
Press the ADD button in the top right.

-
Set the following fields :
-
Gateway = The name of the gateway configured above.
-
Dialplan Expression = The format of the number accepted by the SIP trunk e.g. for 11 digits the format is ^(\d{11})$
-
-
Press the SAVE button on top right corner.
-
Re-open this newly created Outbound Route.
-
Add the following information to the last group:
|
Tag |
Type |
Data |
Group |
Order |
Enabled |
|
action |
ring_ready |
true |
0 |
125 |
true |
-
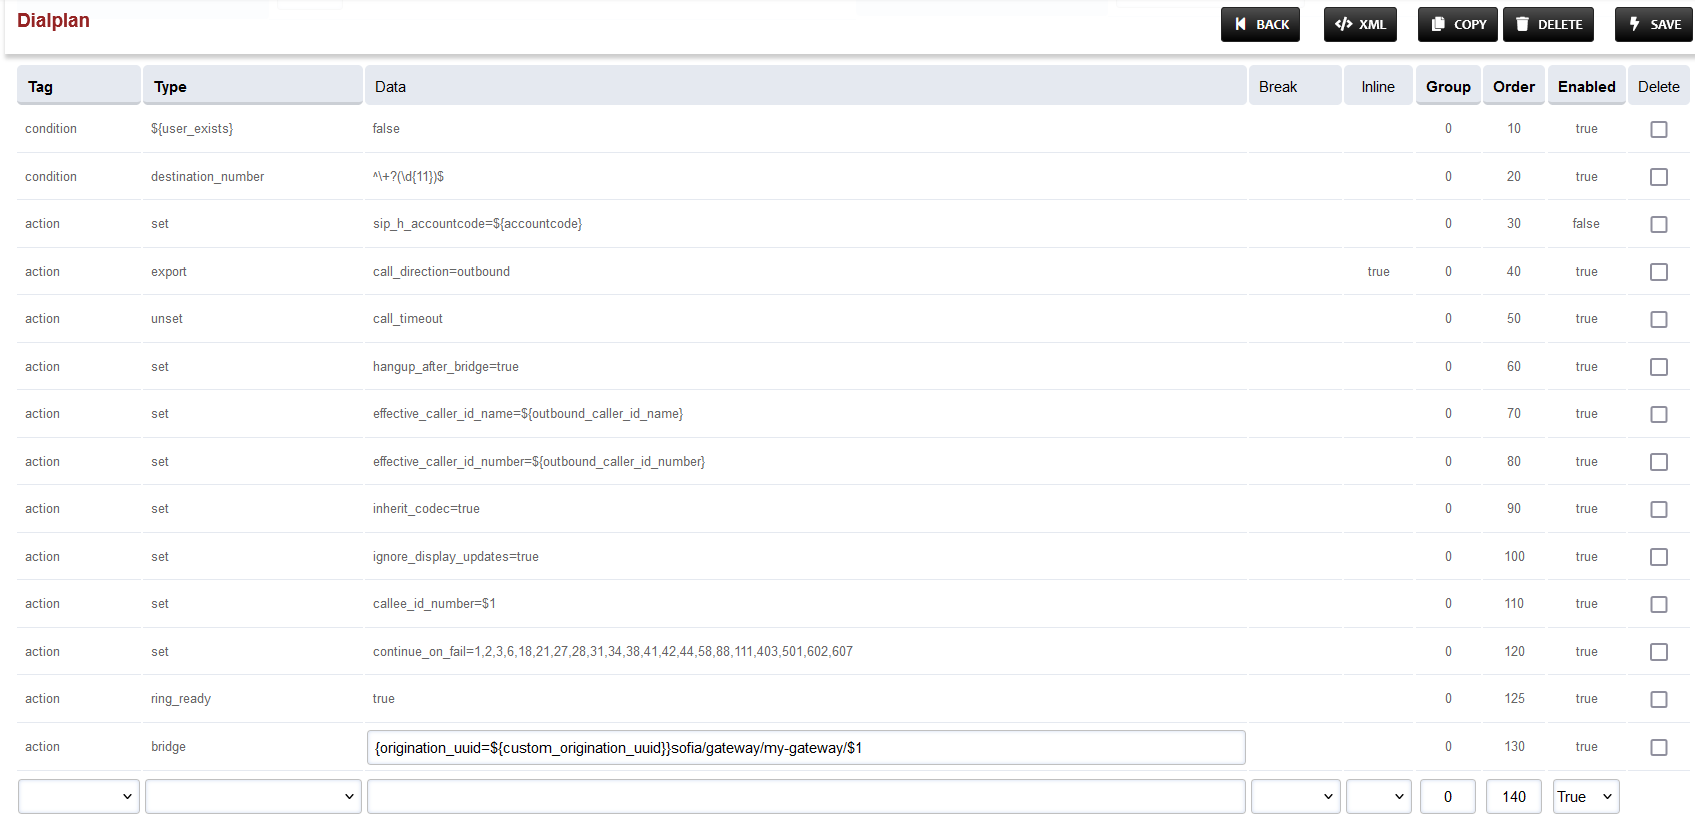
To the last row, where the Type field is bridge, append {origination_uuid=${custom_origination_uuid}} to the start of the field in the Data column. The result will look as below:
Changes in SIP Profile
-
Login to Media Server web interface.
-
Open in browser: https://IP-addr, where IP-addr is the IP address of the Media Server.
-

-
Add the username and password that was shown upon installation of Media Server and press LOGIN.
-
Press the IP address in the top right and select the Domain being used:

-
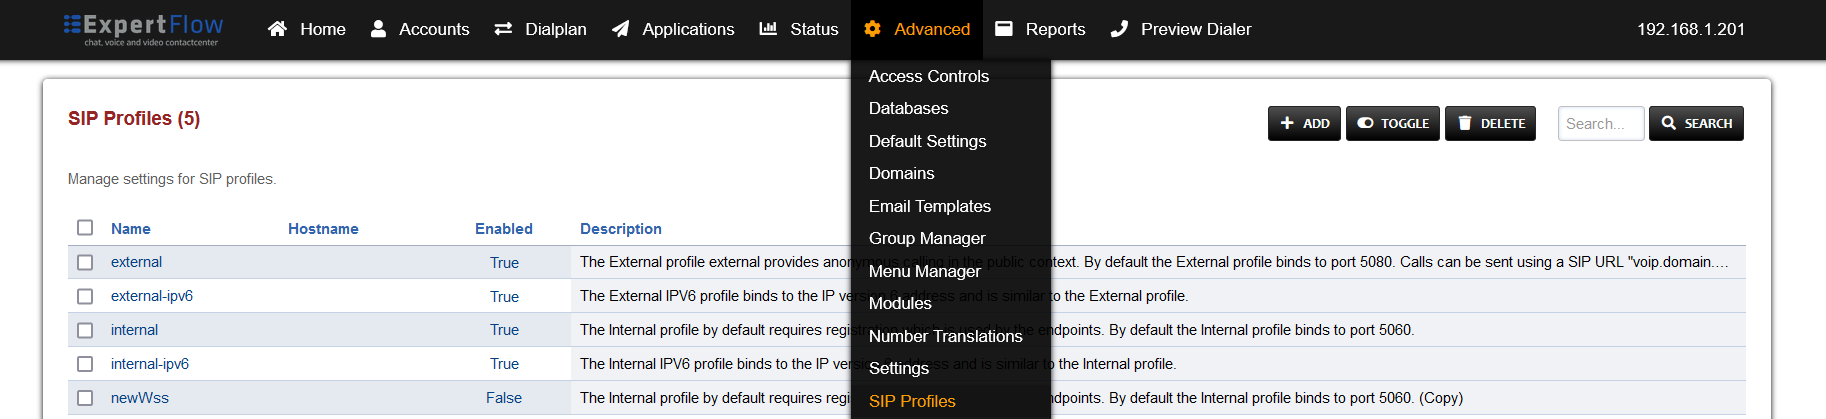
Open SIP Profiles under the Advanced tab.
-
Open the newtest profile, scroll down to the ws-binding and wss-binding fields, and set their Enabled column values to True.

-
Find the liberal-dtmf fields and its Value and Enabled columns to true.
-
At the bottom add the data:
|
Name |
Value |
Enabled |
|---|---|---|
|
apply-candidate-acl |
0.0.0.0/0 |
True |
-
Press the SAVE button on the top right.
-
Open SIP Status under the Status tab.
-
Locate the line sofia status profile newtest and to its right press the RESCAN button, followed by the RESTART button after the page reloads.
External Consult and Transfer Dialplan
-
Login to Media Server web interface.
-
Open in browser: https://IP-addr, where IP-addr is the IP address of the Media Server.
-

-
Add the username and password that was shown upon installation of Media Server and press LOGIN.
-
Press the IP address in the top right and select the Domain created in the Domain creation section above:
-
Open the Dialplan Manager section under the Dialplan tab.
-
Add a new Dialplan by pressing the Add Button on the top.
-
Fill the form with following details :
-
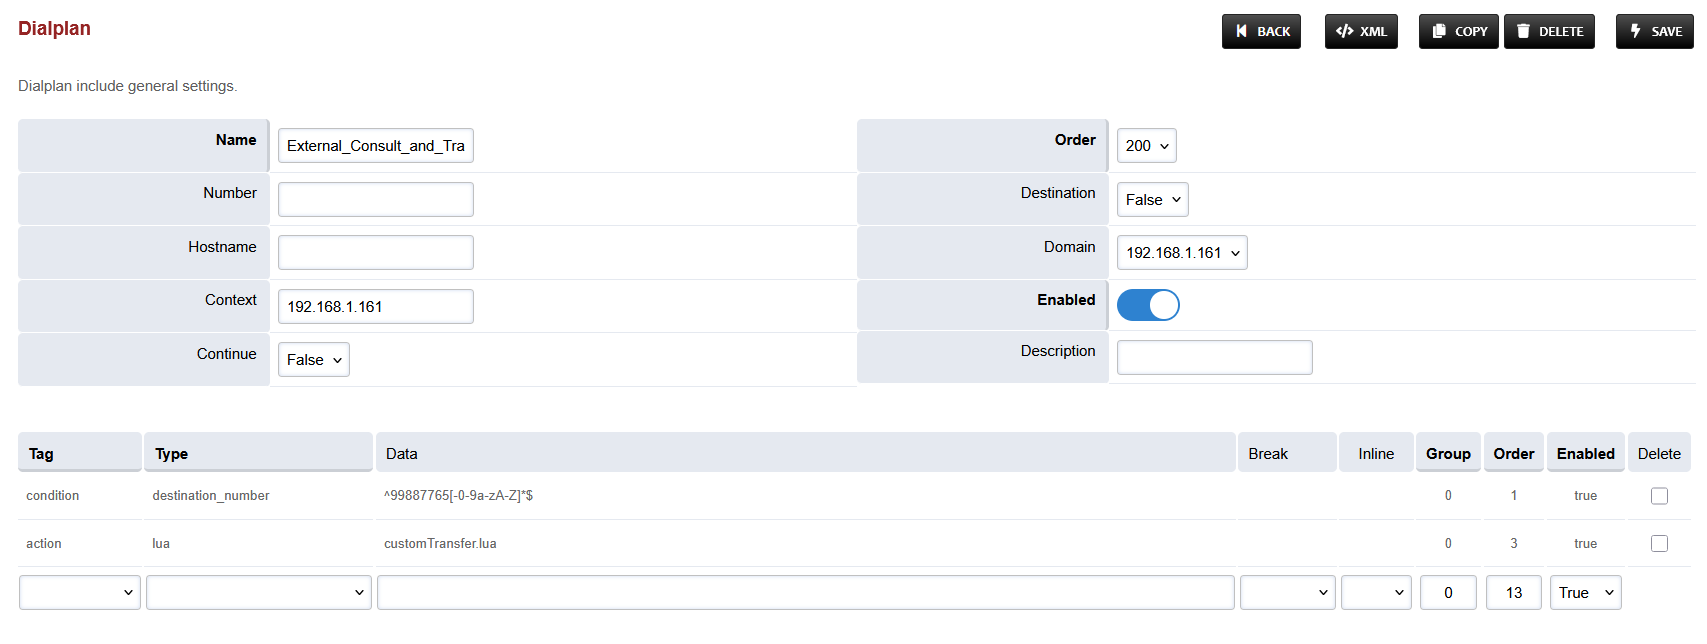
Name = External_Consult_and_Transfer
-
Condition 1 = Select destination_number from list and add a random number
-
Action 1 = Select first item from the list
-
-
Save the form by pressing save button on top right Corner.
-
Re-open the created dialplan.
-
Change the value of the Data column in the destination_number row to ^99887765[-0-9a-zA-Z]*$
-
Change the value of the Type column in the Action row to lua and the Data field to customTransfer.lua
-
Set the Context field to the value of the Domain set in the Domain creation section.
-
Set the Domain field to the value of the Domain set in the Domain creation section.
-
Save the changes by pressing SAVE button in top right corner.
Custom Hangup Dialplan
-
Login to Media Server web interface.
-
Open in browser: https://IP-addr, where IP-addr is the IP address of the Media Server.
-
-
Add the username and password that was shown upon installation of Media Server and press LOGIN.
-
Press the IP address in the top right and select the Domain created in the Domain creation section above:
-
Open the Dialplan Manager section under the Dialplan tab.
-
Add a new Dialplan by pressing the Add Button on the top.
-
Fill the form with following details :
-
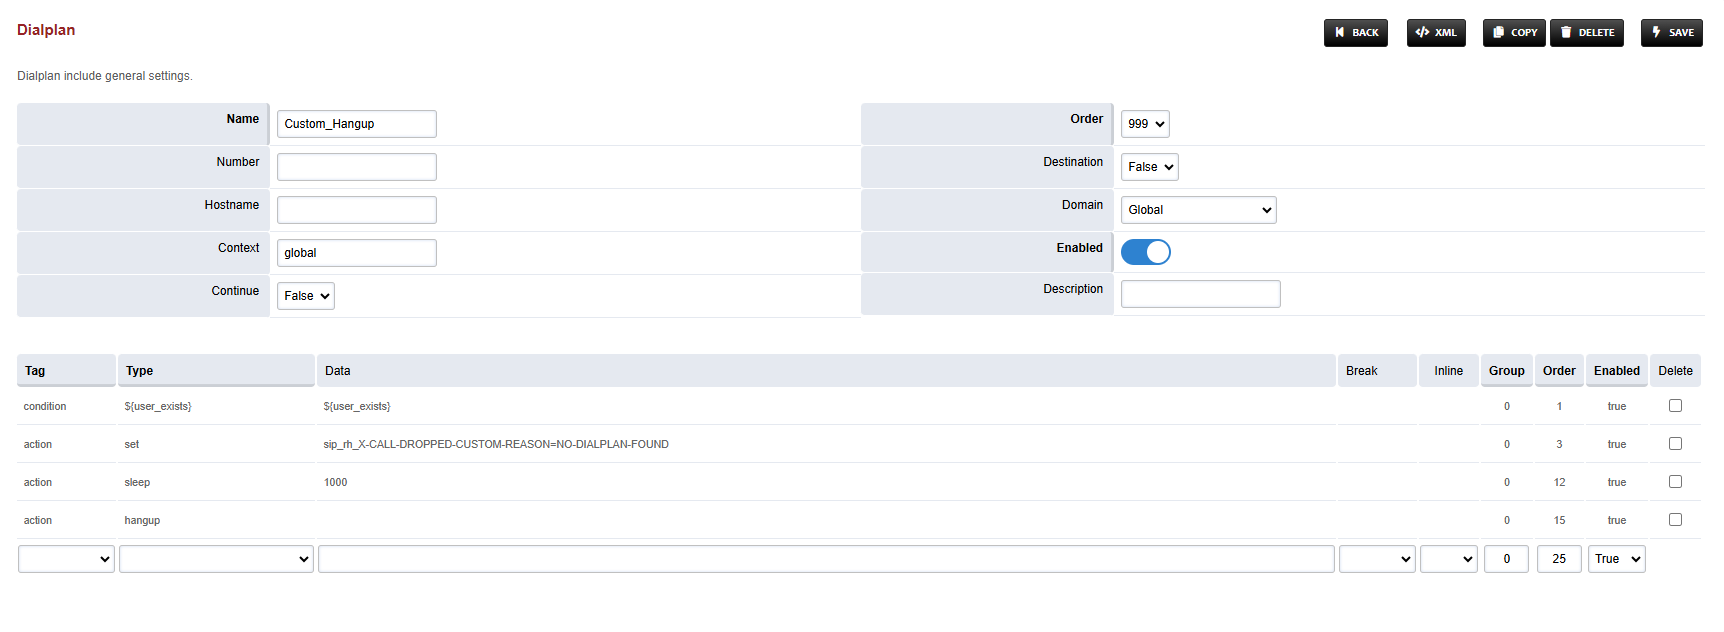
Name = Custom_Hangup
-
Condition 1 = Click the black arrow to the right of the first field. In the first field enter ${user_exists} and in the second field enter ${user_exists}.
-
Action 1 = Select first item from the list
-
-
Save the form by pressing save button on top right Corner.
-
Re-open Custom_Hangup dialplan.
-
Delete the line with the Action tag (Click the checkbox in the right and press SAVE in the top right)
-
Add the following information to this dialplan:
|
Tag |
Type |
Data |
Group |
Order |
Enabled |
|---|---|---|---|---|---|
|
condition |
${user_exists} |
${user_exists} |
0 |
5 |
true |
|
action |
set |
sip_rh_X-CALL-DROPPED-CUSTOM-REASON=NO-DIALPLAN-FOUND |
0 |
10 |
true |
|
action |
sleep |
1000 |
0 |
12 |
true |
|
action |
hangup |
|
0 |
15 |
true |
-
Set the Context field to global.
-
Set the Domain field to Global.
-
Set the Order field to 999.
-
Set the Continue field to False.
-
Save the changes by pressing SAVE button in top right corner.
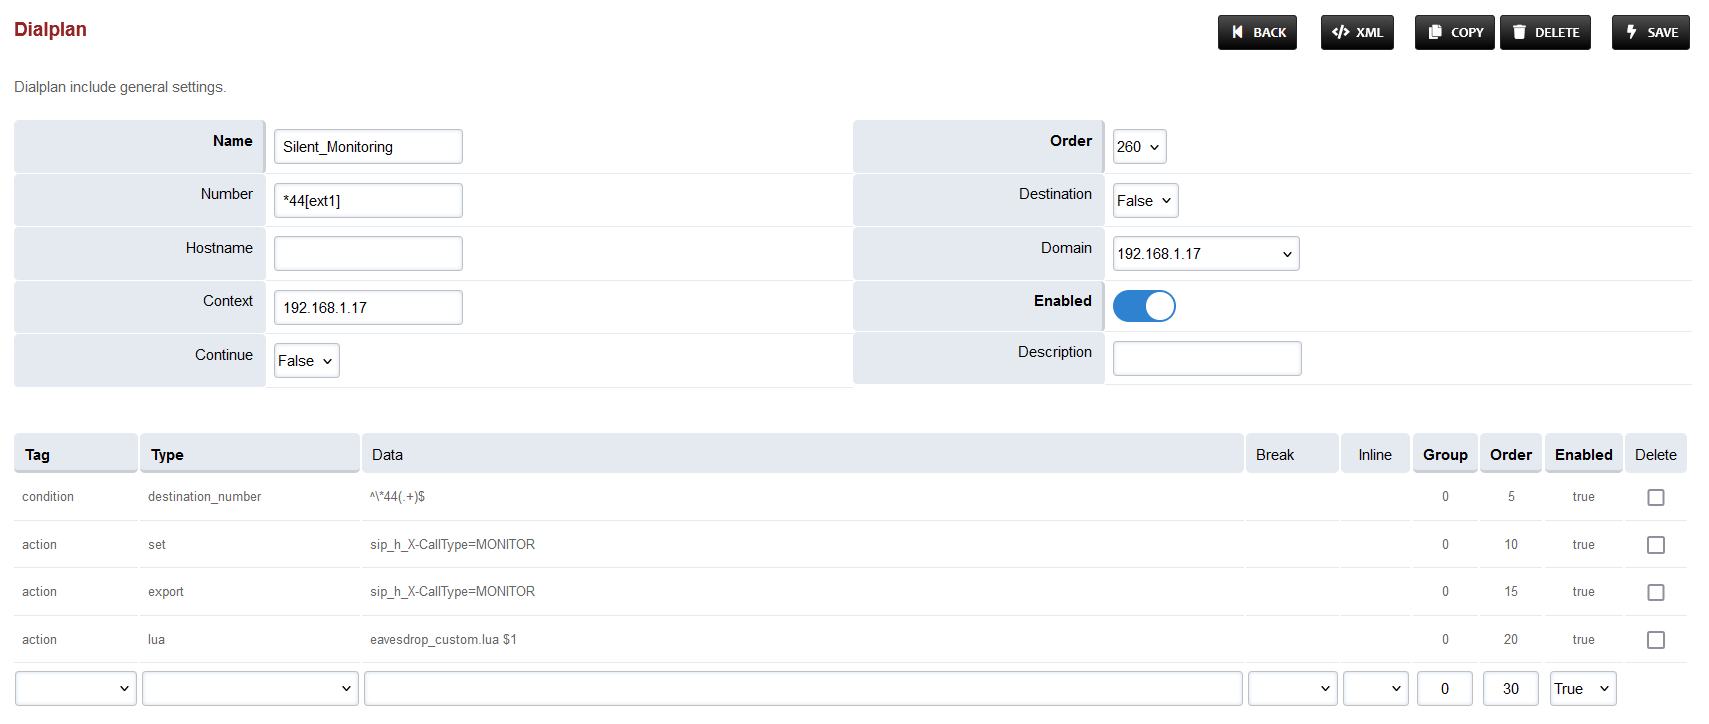
Silent Monitoring Dialplan
-
Login to Media Server web interface.
-
Open in browser: https://IP-addr, where IP-addr is the IP address of the Media Server.
-
-
Add the username and password that was shown upon installation of Media Server and press LOGIN.
-
Press the IP address in the top right and select the Domain created in the Domain creation section above:
-
Open the Dialplan Manager section under the Dialplan tab.
-
Add a new Dialplan by pressing the Add Button on the top.
-
Fill the form with following details :
-
Name = Silent Monitoring
-
Condition 1 = Select destination_number from list and add ^\*44(.+)$
-
Action 1 = Select first item from the list
-
-
Save the form by pressing save button on top right Corner.
-
Re-open Silent Monitoring dialplan.
-
Delete the line with the Action tag (Click the checkbox in the right and press SAVE in the top right)
-
Add the following information to this dialplan:
|
Tag |
Type |
Data |
Group |
Order |
Enabled |
|---|---|---|---|---|---|
|
action |
set |
sip_h_X-CallType=MONITOR |
0 |
10 |
true |
|
action |
export |
sip_h_X-CallType=MONITOR |
0 |
15 |
true |
|
action |
lua |
eavesdrop_custom.lua $1 |
0 |
20 |
true |
-
Set the Context field to the value of the Domain set in the Domain creation section.
-
Set the Domain field to the value of the Domain set in the Domain creation section.
-
Save the changes by pressing SAVE button in top right corner.
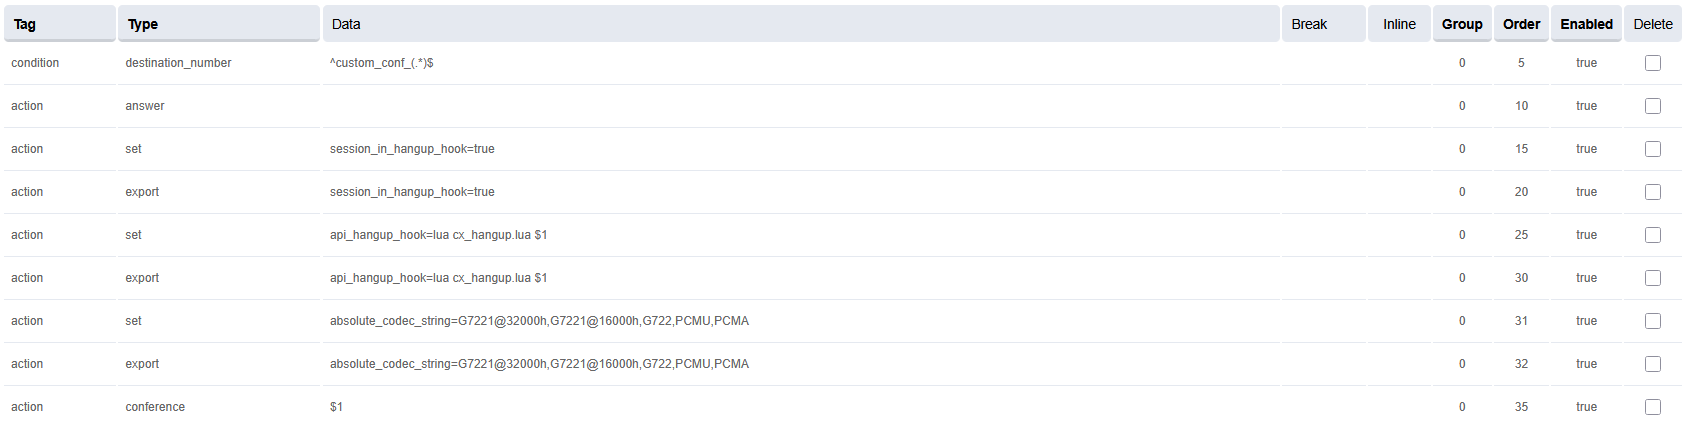
Conference Dialplan
-
Login to Media Server web interface.
-
Open in browser: https://IP-addr, where IP-addr is the IP address of the Media Server.
-
-
Add the username and password that was shown upon installation of Media Server and press LOGIN.
-
Press the IP address in the top right and select the Domain created in the Domain creation section above:
-
Open the Dialplan Manager section under the Dialplan tab.
-
Add a new Dialplan by pressing the Add Button on the top.
-
Fill the form with following details :
-
Name = CustomConf
-
Condition 1 = Select destination_number from list and add ^custom_conf_(.*)$
-
Action 1 = Select first item from the list
-
-
Save the form by pressing save button on top right Corner.
-
Re-open CustomConf dialplan.
-
Delete the line with the Action tag (Click the checkbox in the right and press SAVE in the top right)
-
Add the following information to this dialplan:
|
Tag |
Type |
Data |
Group |
Order |
Enabled |
|---|---|---|---|---|---|
|
action |
answer |
|
0 |
10 |
true |
|
action |
set |
session_in_hangup_hook=true |
0 |
15 |
true |
|
action |
export |
session_in_hangup_hook=true |
0 |
20 |
true |
|
action |
set |
api_hangup_hook=lua cx_hangup.lua $1 |
0 |
25 |
true |
|
action |
export |
api_hangup_hook=lua cx_hangup.lua $1 |
0 |
30 |
true |
|
action |
set |
absolute_codec_string=G7221@32000h,G7221@16000h,G722,PCMU,PCMA |
0 |
31 |
true |
|
action |
export |
absolute_codec_string=G7221@32000h,G7221@16000h,G722,PCMU,PCMA |
0 |
32 |
true |
|
action |
conference |
$1 |
0 |
35 |
true |
-
Set the Context field to the value of the Domain set in the Domain creation section.
-
Set the Domain field to the value of the Domain set in the Domain creation section.
-
Save the changes by pressing SAVE button in top right corner.
Changes in User Exists Dialplan
-
Login to Media Server web interface.
-
Open in browser: https://IP-addr, where IP-addr is the IP address of the Media Server.
-

-
Add the username and password that was shown upon installation of Media Server and press LOGIN.
-
Press the IP address in the top right and select the Domain created in the Domain creation section above:

-
Open the Dialplan Manager section under the Dialplan tab.
-
Find and open the user_exists dialplan.
-
Add the following information(to add custom values in the Type column, select a random value then click on it to edit):
|
Tag |
Type |
Data |
Group |
Order |
Enabled |
|---|---|---|---|---|---|
|
condition |
${sip_h_X-CallType} |
^CONSULT$ |
3 |
5 |
true |
|
action |
bind_meta_app |
A a s1 lua::consult_conf.lua CONSULT_TRANSFER |
3 |
10 |
true |
|
action |
bind_meta_app |
C a s1 lua::consult_conf.lua CONSULT_CONFERENCE |
3 |
15 |
true |
-
The result will look like this:

-
Save the changes by pressing SAVE button in top right corner.
Changes in Call Recording Dialplan
-
Login to Media Server web interface.
-
Open in browser: https://IP-addr, where IP-addr is the IP address of the Media Server.
-
-
Add the username and password that was shown upon installation of Media Server and press LOGIN.
-
Press the IP address in the top right and select the Domain created in the Domain creation section above:
-
Open the Dialplan Manager section under the Dialplan tab.
-
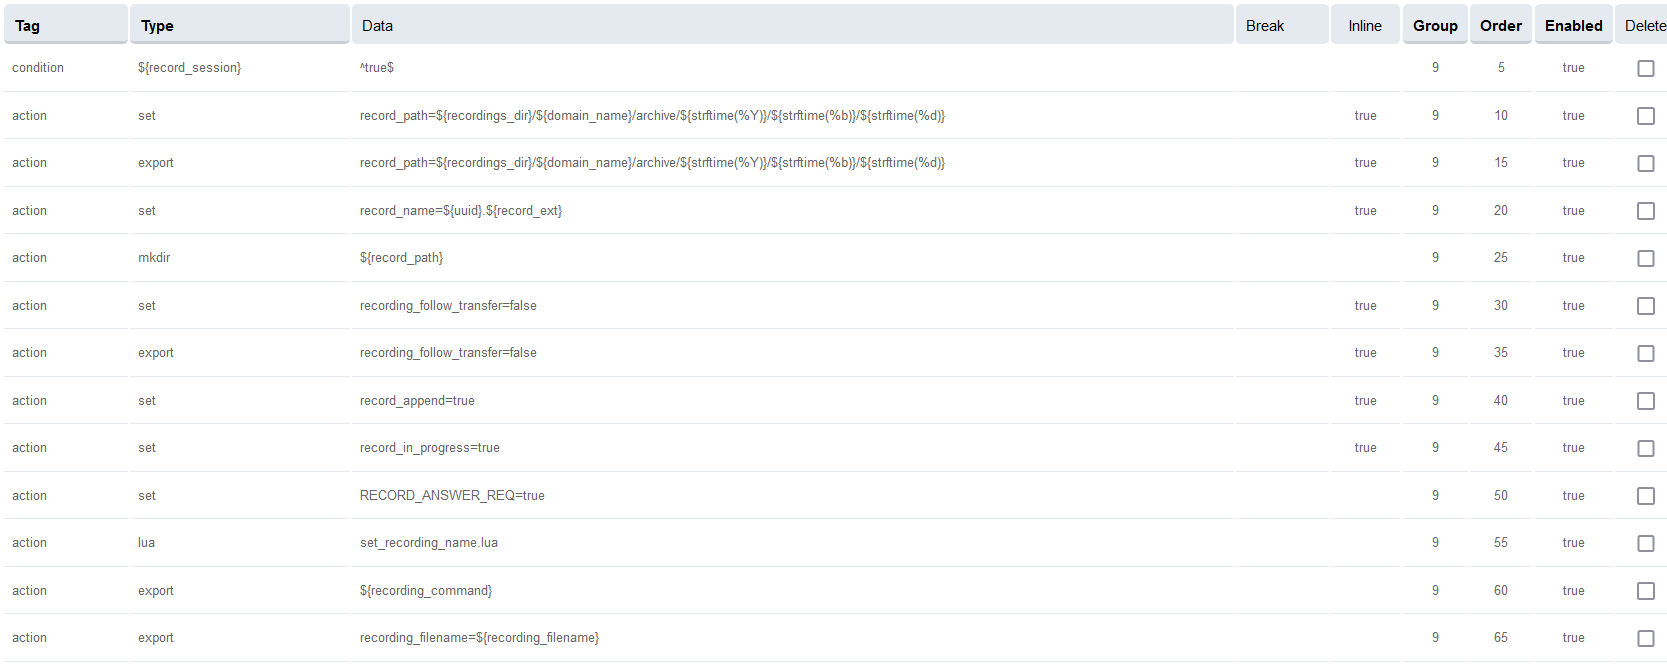
Find and open the user_record dialplan.
-
Make sure to delete the lines present previously in Group 9, and NOT in the table and image below.
-
Add the following data to the table, such that the final version of Group 9 looks like the image below:
|
Tag |
Type |
Data |
Inline |
Group |
Order |
Enabled |
|---|---|---|---|---|---|---|
|
action |
set |
record_path=${recordings_dir}/${domain_name}/archive/${strftime(%Y)}/${strftime(%b)}/${strftime(%d)} |
true |
9 |
10 |
true |
|
action |
export |
record_path=${recordings_dir}/${domain_name}/archive/${strftime(%Y)}/${strftime(%b)}/${strftime(%d)} |
true |
9 |
15 |
true |
|
action |
set |
record_name=${uuid}.${record_ext} |
true |
9 |
20 |
true |
|
action |
mkdir |
${record_path} |
- |
9 |
25 |
true |
|
action |
set |
recording_follow_transfer=false |
true |
9 |
30 |
true |
|
action |
export |
recording_follow_transfer=false |
true |
9 |
35 |
true |
|
action |
set |
record_append=false |
true |
9 |
40 |
true |
|
action |
set |
record_in_progress=true |
true |
9 |
45 |
true |
|
action |
set |
RECORD_ANSWER_REQ=true |
- |
9 |
50 |
true |
|
action |
lua |
set_recording_name.lua |
- |
9 |
55 |
true |
|
action |
export |
${recording_command} |
- |
9 |
60 |
true |
|
action |
export |
recording_filename=${recording_filename} |
- |
9 |
65 |
true |
-
Save the changes by pressing SAVE button in top right corner.
Changes in conference profile
-
Login to Media Server web interface.
-
Open in browser: https://IP-addr, where IP-addr is the IP address of the Media Server.
-

-
Add the username and password that was shown upon installation of Media Server and press LOGIN.
-
Press the IP address in the top right and select the Domain created in the Domain creation section above:

-
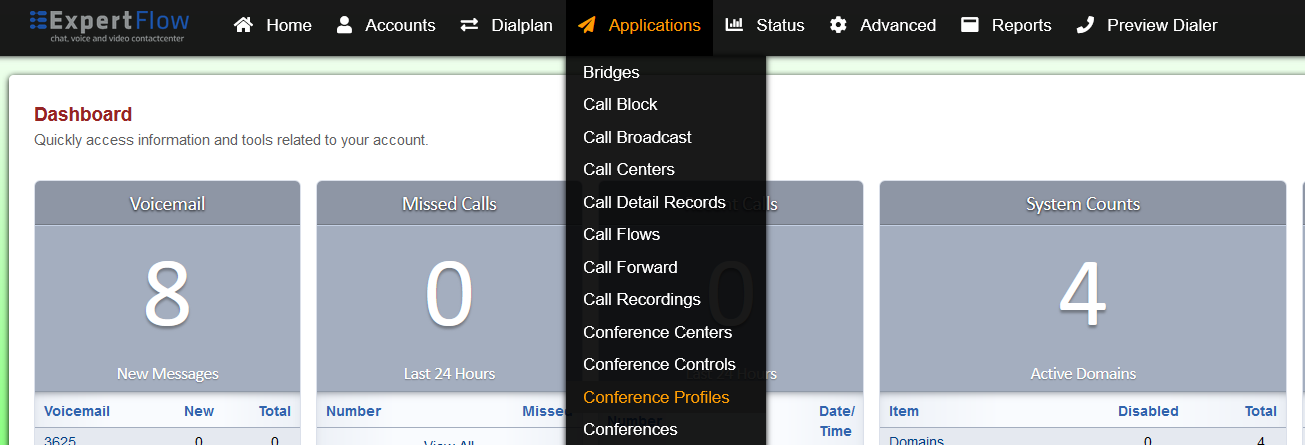
Open the Conference Profiles section under the Applications tab:
-
Open the profile named default:
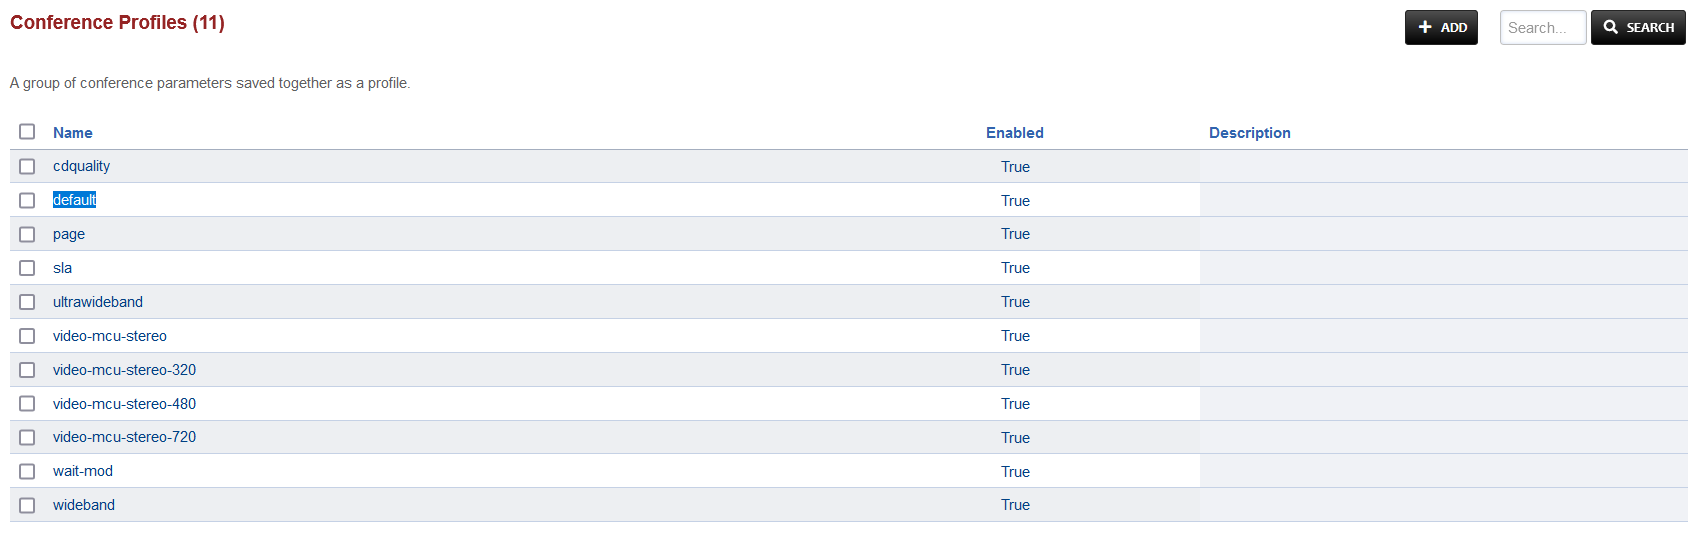
-
Under the Profile Parameters, find the following keywords under the Name column and click the checkbox:
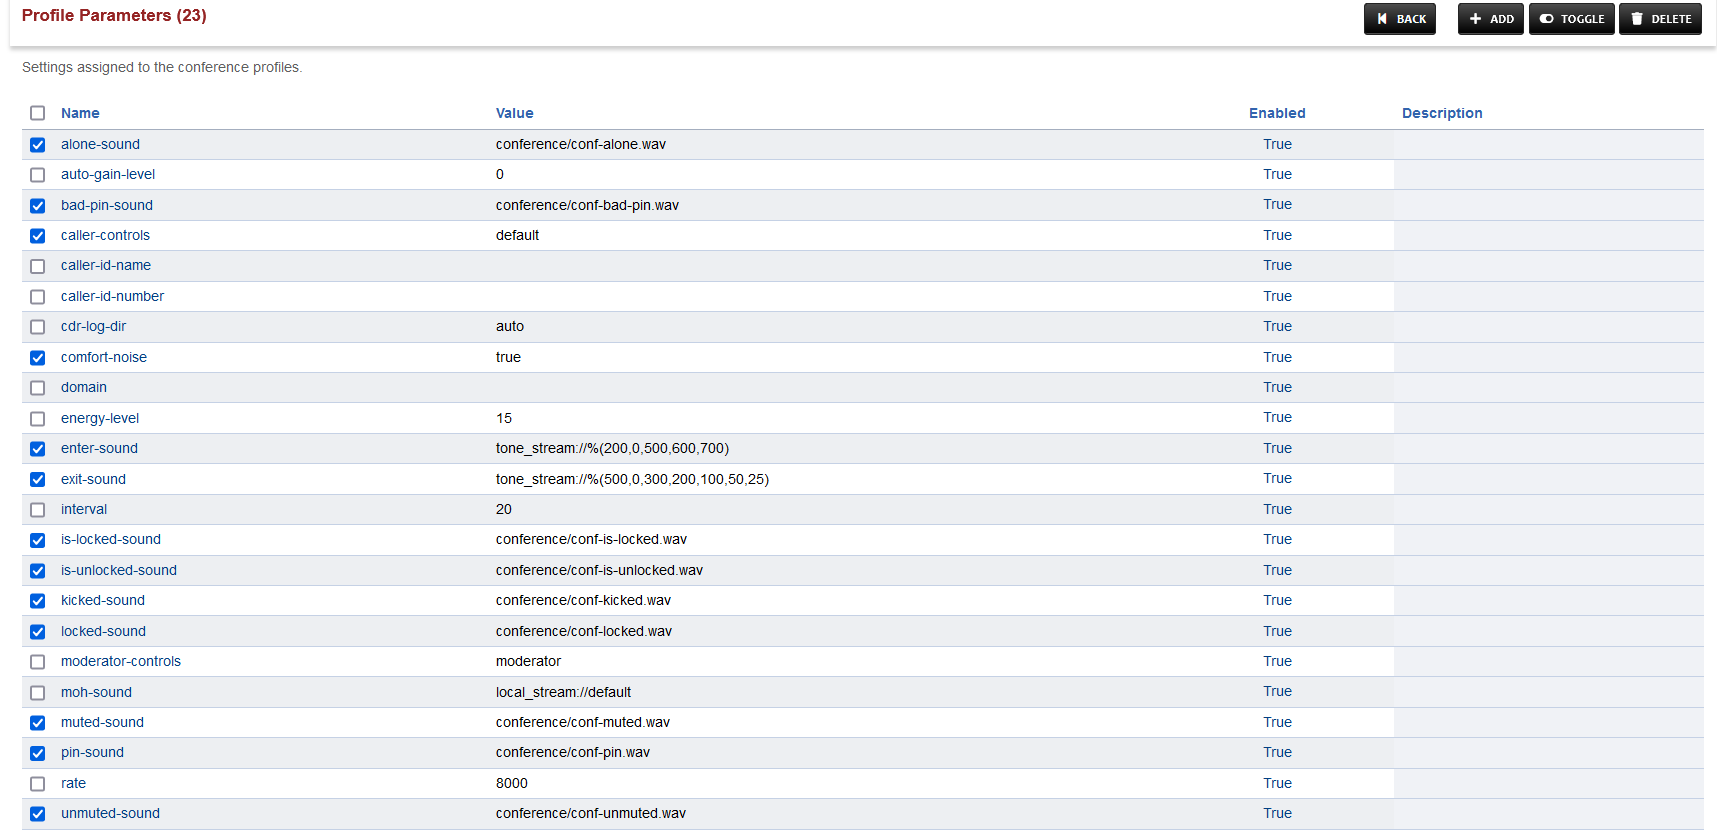
-
Press TOGGLE in the top right and choose CONTINUE in the prompt shown.
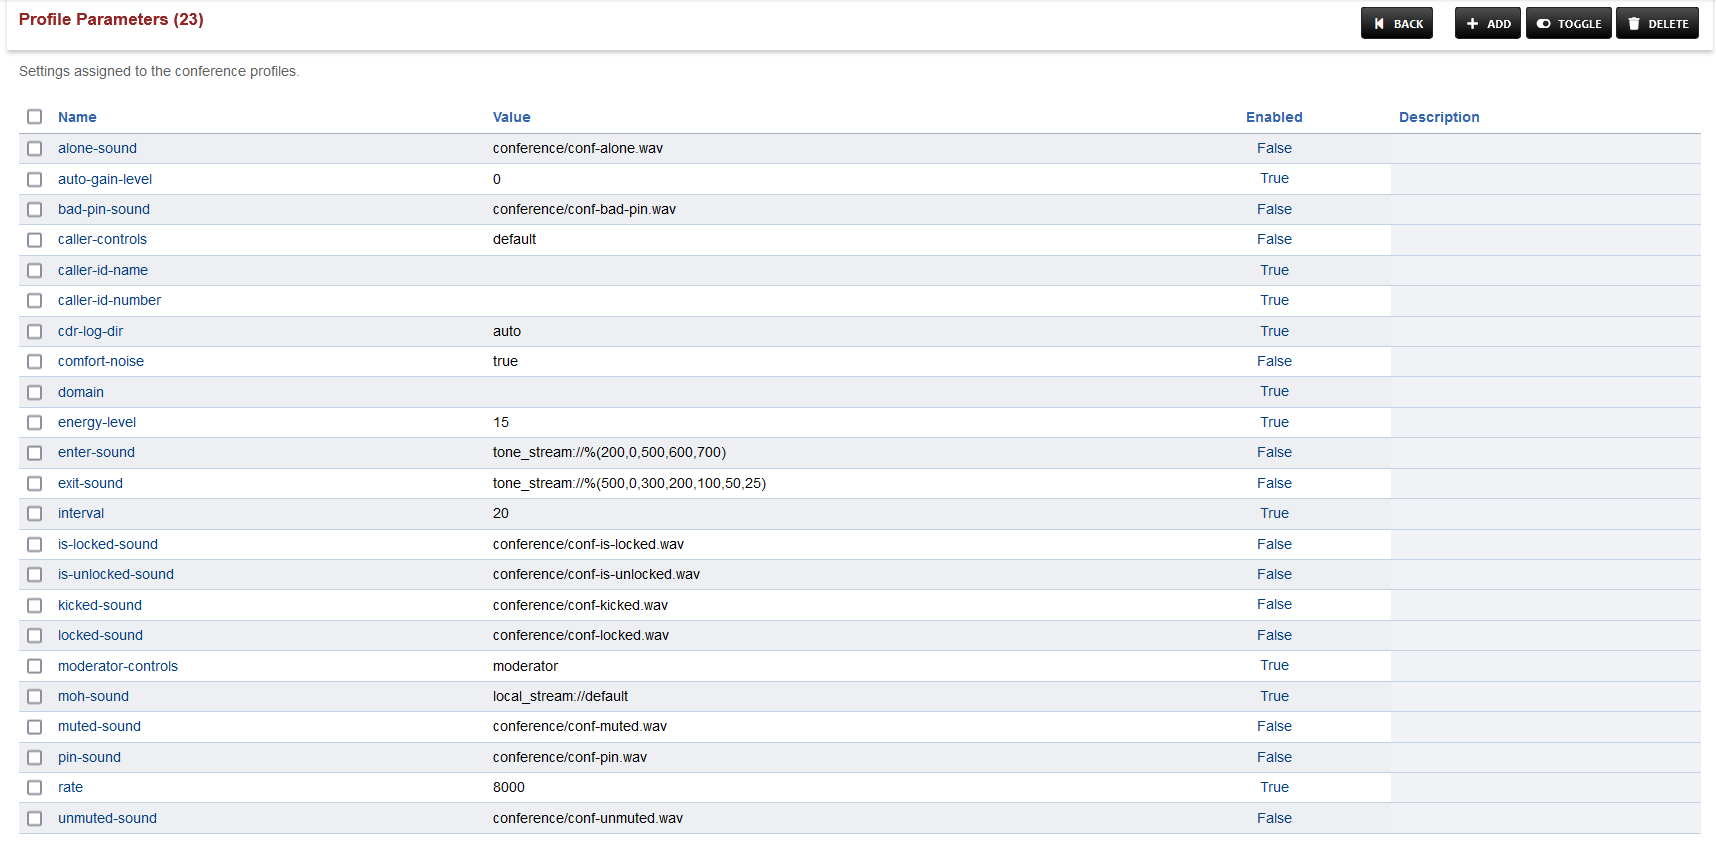
-
Save the changes by pressing SAVE button in top right corner.