Purpose
The WFM Data Pipeline is design to load the Agent and Queue connected calls data into their respective data tables. In this regard, the DBT models are created that are orchestrated with 15 minutes interval to sync the data. Additionally, the historical data loading mechanism is also in place that enables loading data within a dedicated timeline
Dependency
The agent_connected_calls and queue_connected_calls tables are dependent on the following source tables present within the same dedicated server
-
agent
-
agent_state
-
agent_task
-
conversation_hold_resume
-
report_offset
-
queue
Configurations
Configurations for WFM Data Pipeline are provided in a yaml format in transflux/config/wfm_queries_config_template.yaml directory in your solution deployment to ensure flexibility and adaptability. These configurations are designed for normal and ideal use cases and are advised to be used as-is to achieve optimal results. The credentials are dynamically placed during deployment from tenants.yaml
dbt_models:
  - name: agent_connected_calls
    time_offset: -15
  - name: queue_connected_calls
    time_offset: -15

target:
  type: "{TARGET_TYPE}"
  db_url: "mysql+pymysql://{TARGET_USERNAME}:{TARGET_PASSWORD}@{TARGET_HOST}:{TARGET_PORT}/{TARGET_DATABASE}"
  enable_ssl: {TARGET_SSL_ENABLED}
  ssl_ca: "/transflux/certificates/mysql_certs/ca.pem"
  ssl_cert: "/transflux/certificates/mysql_certs/client-cert.pem"
  ssl_key: "/transflux/certificates/mysql_certs/client-key.pem"

schedule_interval: "*/15 * * * *"
time_offset: "0" # Not to be changed, please keep it as "0"
interval_minutes: 15
start_date: "2025-09-02T08:00:00+00:00"
catchup: false
tenant_id: {TENANT_ID}
How to Run the pipeline:
In order to run the WFM Data Pipeline (WFM_Queries), there can be two cases.
1. If there is no Historical Data to be loaded:
For this case if you don't have any historical agent_task data, you can simply set the datetime within your accordance in start_date field in the configuration file and simply just un-pause the pipeline from the Data Platform UI to start executing the WFM queries on your data.
2. If there is some Historical Data to be loaded:
In case you have Historical Data regarding agent_task then you would have trigger the pipeline manually from the Data Platform UI. Please follow the following steps for this purpose:
-
Go to your configuration file and set the datetime in
start_timeto the current datetime or the datetime from which you want to run your latest WFM query data. After this un-pause the WFM queries pipeline in Data Platform UI and the schedule will start executing the WFM query on the data according to your setstart_timein the configuration file. -
Now for running the WFM query on the historical data, go to your pipeline and select the trigger option in the top right corner of the Data Platform UI as shown below.
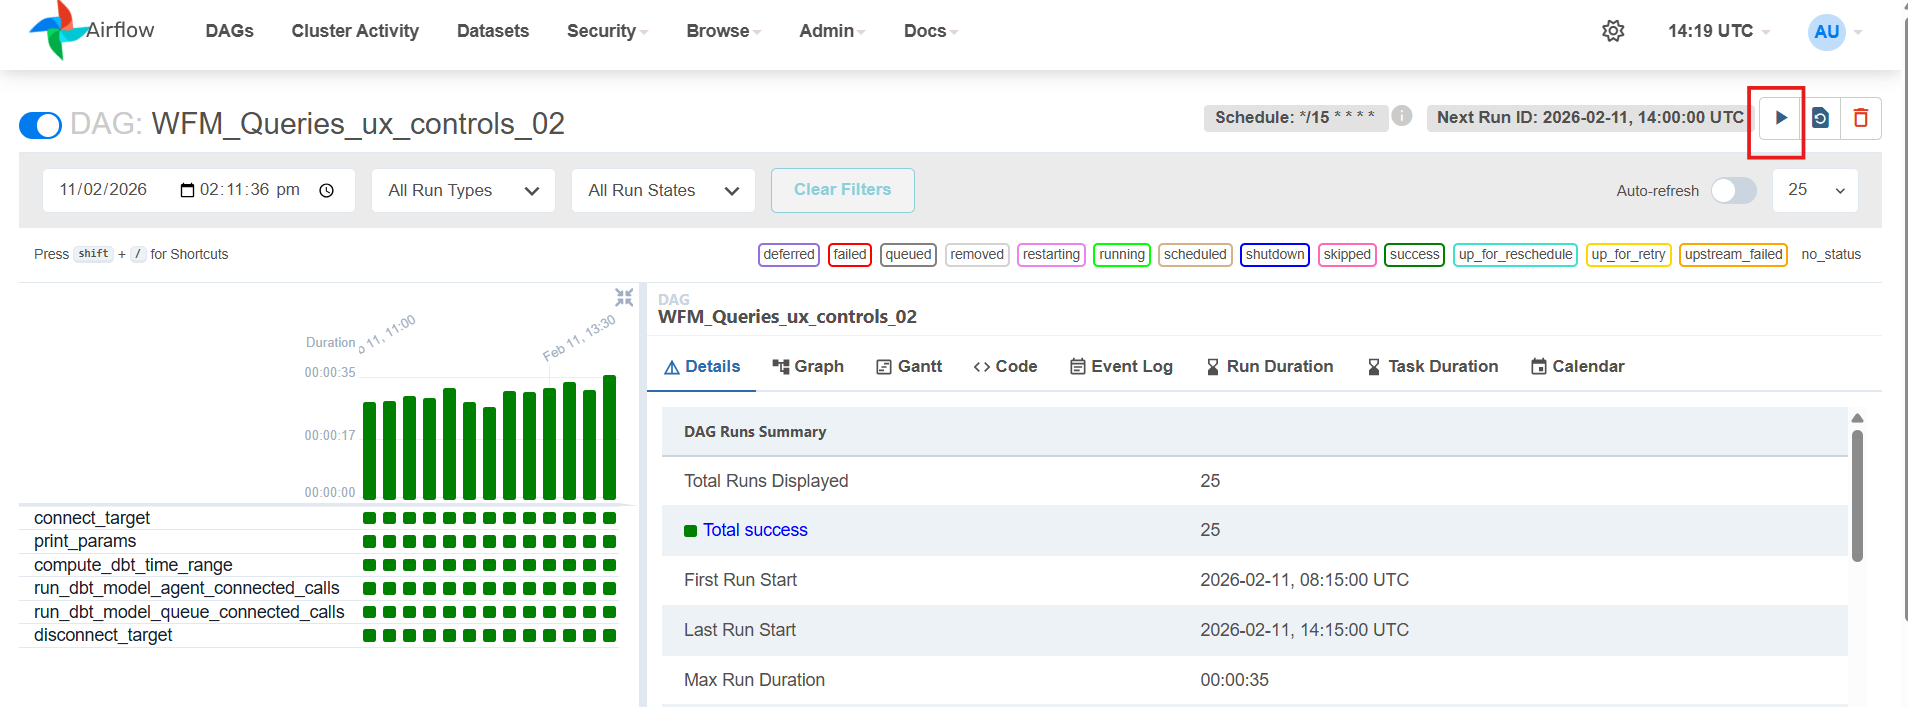
-
Once you click the trigger option you would be presented with the following screen. In the
custom_model_namesfield enter the exact gold query name/names (in the format given in the screenshot) that you want to run manually on custom time. Now enter thecustom_start_timeandcustom_end_timewith the same format as being shown in the screenshot according to which your data is present (custom_start_timebeing the oldest data andcustom_end_timebeing the latest data).
Please add the date and time carefully, ensuring no time interval is missed to get the complete data in your database. The time should be added here according to UTC timezone.
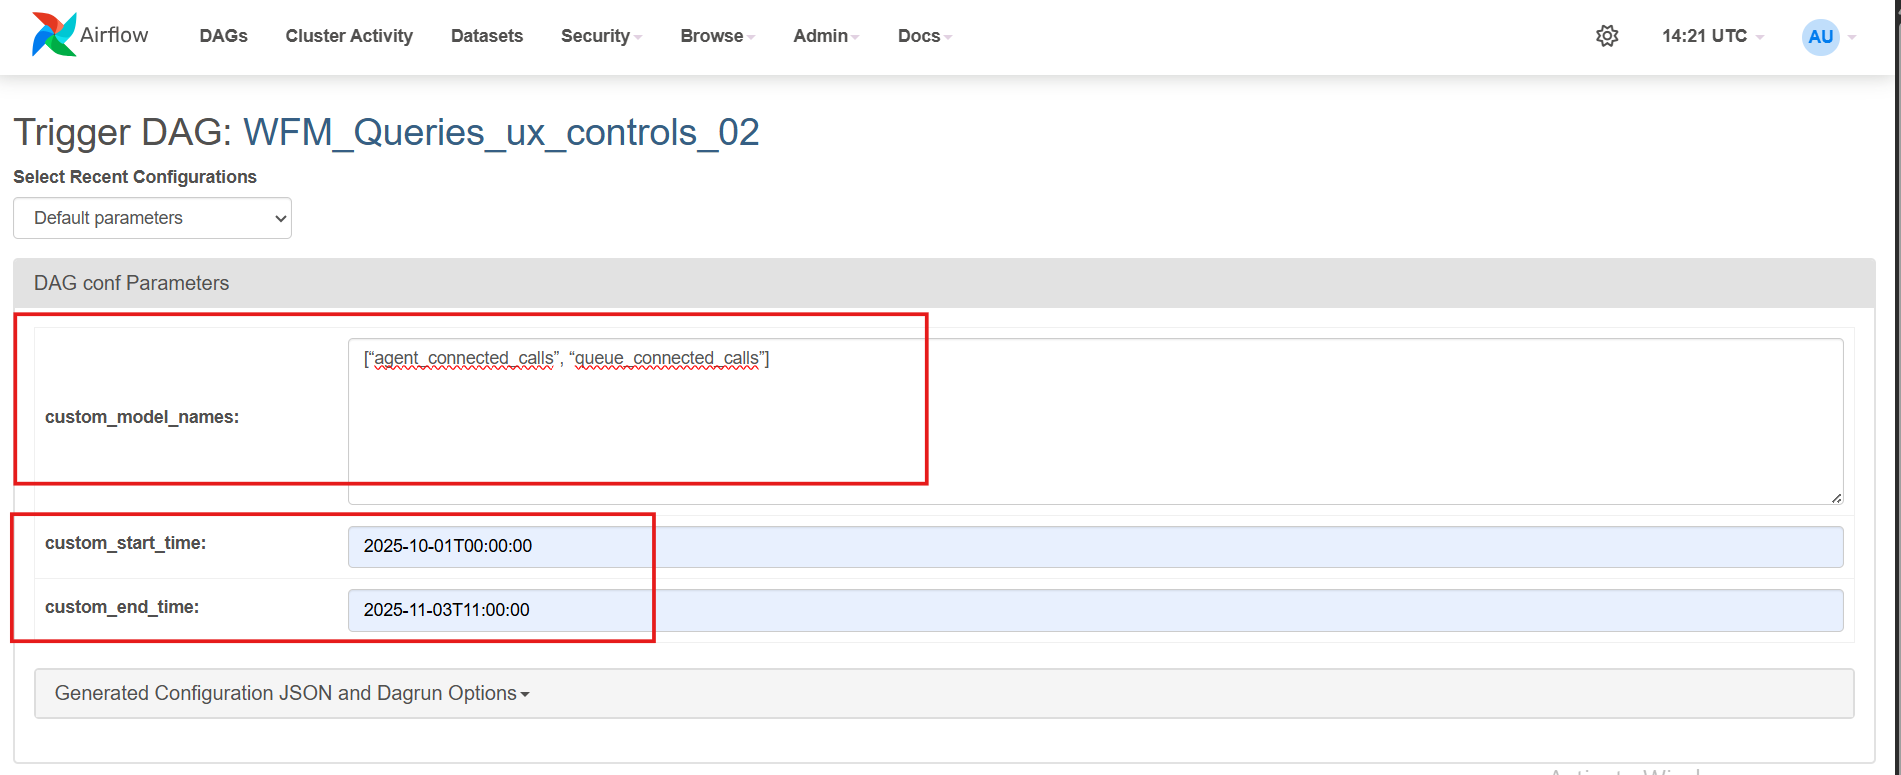
Please note that the query name and the format should be the exact as mentioned in your configuration file and the screenshot above, else the query would not run with custom time and would run with the normal scheduled time. Also the custom_model_names should be given as a list separated by commas and in double quotes.
-
Once you set your datetime here, click ‘Trigger’. This will start the pipeline run and will execute the WFM queries on the historical data present according to the start and end datetime given and load all the historical WFM gold level data in a single run.